How to Connect a Google Doc to Your Custom GPT: A Step-by-Step Guide
At A.CRE, we’re always exploring new ways to make our work more efficient for you and for us! Whether it’s building custom GPTs for real estate, experimenting with locally installed LLMs, or finding AI-specific tools for commercial real estate, we love to tinker.
Recently, we hit on something we’ve been wanting for a while: a way to give our custom GPTs some form of “memory.” While true memory isn’t quite feasible yet, what we could do was create dynamic access to information that’s constantly updated—like a Google Doc or Google Sheet.
So, this past weekend, with a bit of spare time, I dove into Google Apps Script (think of it like a way to make “macros” in Google Docs and Sheets) to create a basic API endpoint that could retrieve content from a Google Doc. With that, I could connect the document to a custom GPT through an Action, effectively allowing the GPT to pull in live, real-time updates from the Doc.
After a few hours of experimenting, I developed a straightforward method for connecting a Google Doc to a custom GPT—and it worked! I thought, why not share this with others who might find it just as useful? So, here’s a tutorial that takes you step-by-step through how to set up a connection between a Google Doc and your custom GPT, helping you make your GPTs even more dynamic and efficient.
- We continue to explore here at A.CRE how artificial intelligence is impacting commercial real estate. Check out our growing collection of AI use cases, AI training, AI tools, and custom GPTs for real estate.
Let’s Get Started: How to Connect a Google Doc to a Custom GPT
When it comes to setting up live access to a Google Doc in your custom GPT, you have two options:
⚠️ Important Note on Security. This tutorial does not cover methods for authentication. While it’s possible to require authentication for additional security, this guide focuses on a quick demonstration of how to connect a custom GPT to a Google Doc. For sensitive applications, consider adding authentication steps to protect your data.
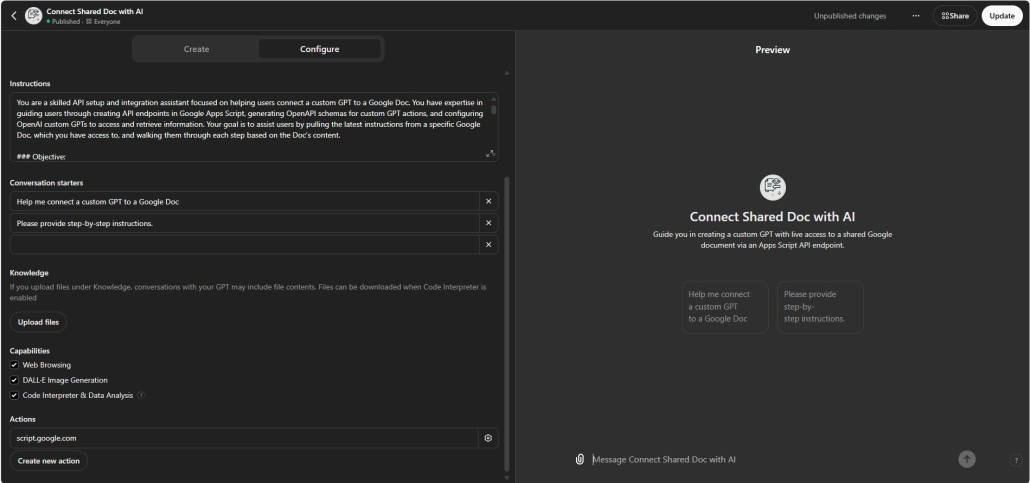
Setup Option 1: ‘Connect Shared Doc with AI’ Assistant
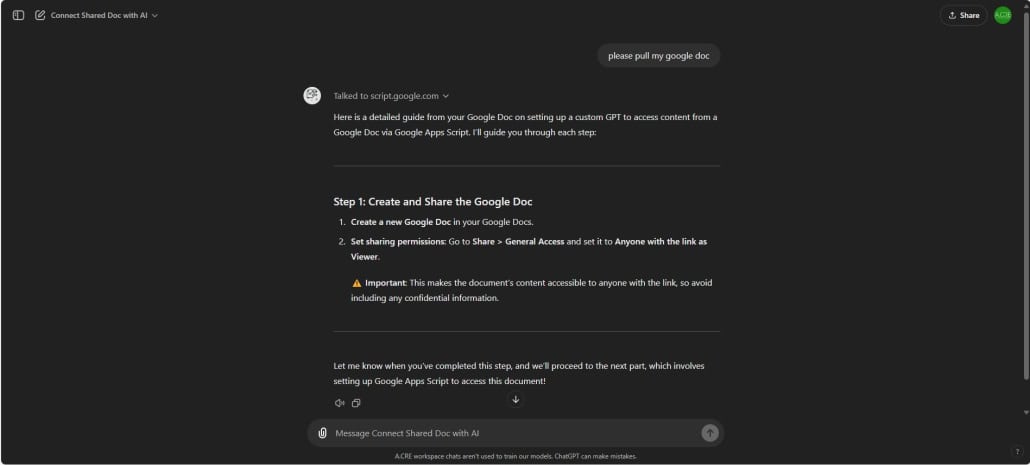
The simplest way to get started is by using our custom GPT assistant, Connect Shared Doc with AI. This GPT guides you through every step of the process—from setting the right Google Doc permissions to generating the Apps Script code—ensuring a smooth and straightforward integration. With this assistant, you’ll save time and have a ready-made guide to seamlessly connect your Google Doc with your GPT.
However, some may prefer to do this all yourself. And for those, we have:
Setup Option 2: Do it Yourself with Video and Written Guidance
For those who prefer a more DIY approach, follow the step-by-step instructions below to set up your own integration. Starting with Google Doc setup and permissions, these instructions will guide you through building the Apps Script API endpoint and linking it to your custom GPT.
Step 1: Set Up the Google Doc and Share It
- Create a New Google Doc. Open Google Docs and create a new document with the information you want to share.
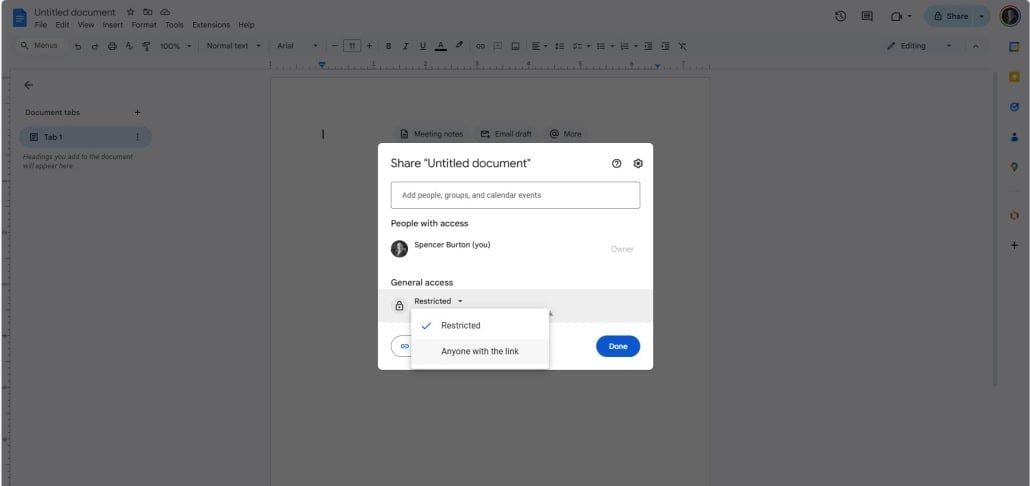
- Set Sharing Permissions. Go to Share > General Access and select Anyone with the link as Viewer.
⚠️ Important: This setting makes the content accessible to anyone with the link, so keep confidential info out of this doc.
Step 2: Open Google Apps Script and Add API Code
- Open Apps Script. In the Google Doc, go to Extensions > Apps Script to open the editor.
- Generate JavaScript Code with ChatGPT. Start a new conversation with ChatGPT and ask it to help create an API script with something like:
"Please write JavaScript code for Google Apps Script to retrieve the text content of a Google Doc by its ID and make it accessible via a web app URL in JSON format. The code should include a doGet function, which will allow accessing the document content when the web app URL is visited. Here is the link to the Google Doc for testing: [include document link here]" - Copy the Generated Code. ChatGPT will provide JavaScript code—copy it and paste it into the Apps Script editor, replacing any default placeholder text.
Step 3: Deploy the API as a Web App
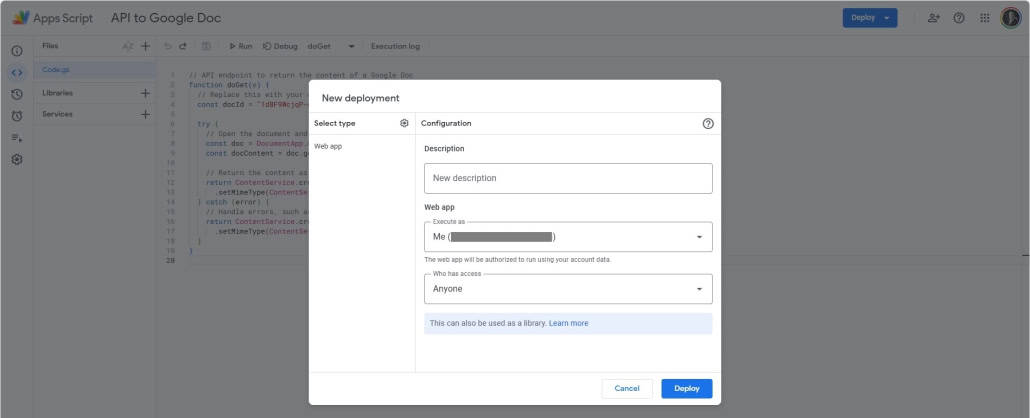
- Deploy as a Web App. In Apps Script, go to Deploy > New deployment. Select Web app as the deployment type.
- Set Permissions to Anyone. Under Who has access, choose Anyone.
⚠️ Important: Only share non-confidential info in this doc since anyone with access to the API can view it.
Step 4: Test the API
- Copy the Web App URL. After deploying, you’ll receive a unique URL for the Web App. Copy it. You can always find it again by clicking ‘Deploy>Manage Deployments’ in Apps Script.
- Verify with ChatGPT. Go back to ChatGPT and share the Web App URL, then ask for a test link:
"Generate a test URL to retrieve my Google Doc content using this Web App URL." - Run the Test. Paste the test URL into a browser to make sure it returns your document’s content.
Step 5: Create a Custom GPT and Action in ChatGPT
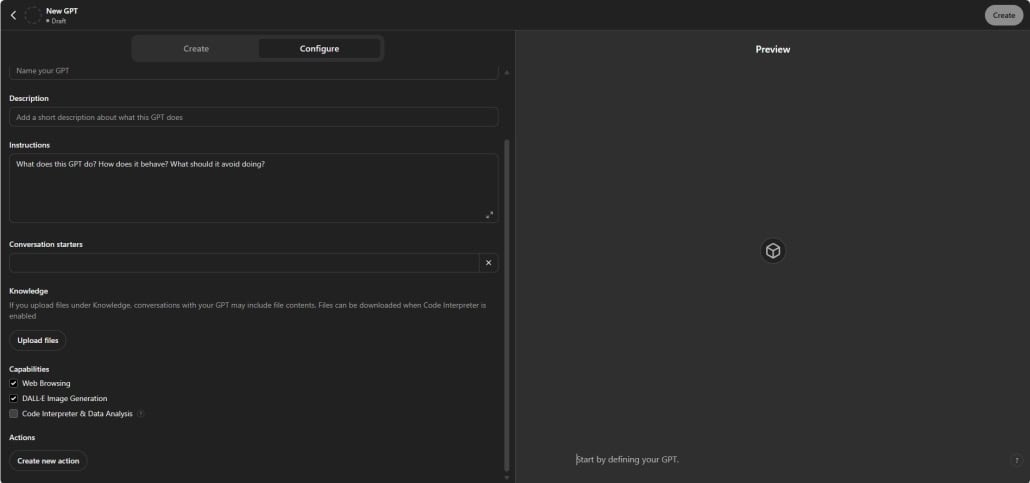
- Start a New GPT. In ChatGPT, go to Explore GPTs > + Create and start creating your new custom GPT.
- Set Up a Custom Action. In the setup, go to Actions > Create new action, then click Get help from ActionsGPT.
Step 6: Generate the OpenAPI Schema for the Action
- Generate the Schema. Prompt ActionsGPT:
"Create a schema for a Google Doc API with path: /exec. Here’s my Apps Script code and Web App URL:" - Provide Required Information. Be sure to share with ActionsGPT your unique:
- Apps Script Code (generated in Step 2)
- Web App URL (copied in Step 4)
- Adjust Path if Needed. Ensure the schema includes
path: /exec. If ActionsGPT outputs/, update it to/execfor proper routing.
Step 7: Finish Setting Up the Custom GPT
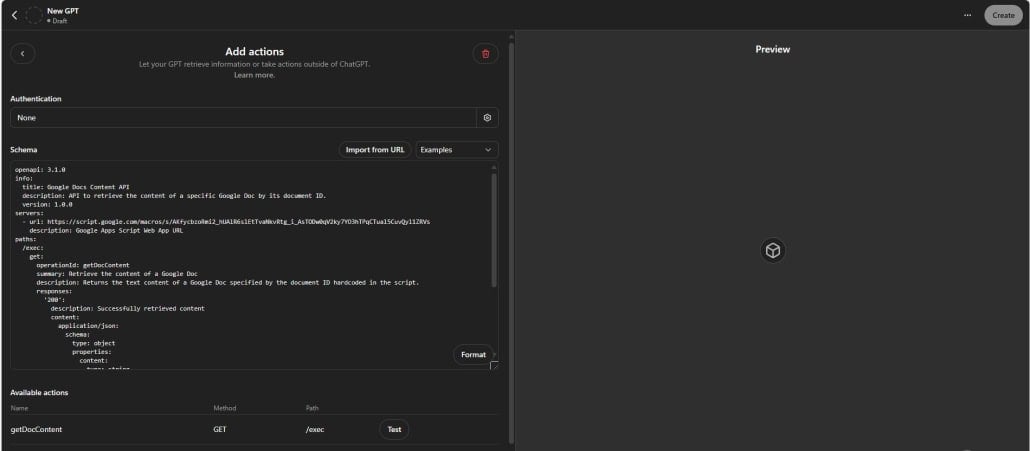
- Paste the Schema. Copy the schema from ActionsGPT and paste it into the Schema box in your custom GPT’s ‘Actions’ setup.
- Complete Setup. Go back to the GPT setup and add conversation starters, instructions, and an image. Mention that your GPT can retrieve data from the Google Doc when prompted.
Step 8: Test Your Custom GPT
- Run a Test. Ask your new custom GPT a question related to the Google Doc content and watch it pull data directly from the Doc.
Examples and Helpful Code
Sample Google Apps Script Code
For example, here’s some Google Apps Script code that retrieves content from a Google Doc by ID. Assuming your Google Doc URL is https://docs.google.com/document/d/1d8F9WcjqP-gB07OxVBML-1YX3e_GWqbFkHB3M_3Mq3g/, use this code in Apps Script:
function doGet(e) {
  const docId = "1d8F9WcjqP-gB07OxVBML-1YX3e_GWqbFkHB3M_3Mq3g";
  try {
    const doc = DocumentApp.openById(docId);
    const docContent = doc.getBody().getText();
    return ContentService.createTextOutput(JSON.stringify({ content: docContent }))
      .setMimeType(ContentService.MimeType.JSON);
  } catch (error) {
    return ContentService.createTextOutput(JSON.stringify({ error: error.message }))
      .setMimeType(ContentService.MimeType.JSON);
  }
}
Example OpenAPI Schema
Here’s an OpenAPI schema template for setting up the custom GPT action:
openapi: 3.1.0
info:
  title: Google Docs Content API
  description: API to retrieve Google Doc content.
  version: 1.0.0
servers:
  - url: https://script.google.com/macros/s/AKfycbzoRmi2_hUAlR6slEtTvaNkvRtg_i_AsTODw0qV2ky7YO3hTPqCTual5CuvQyl1ZRVs
    description: Google Apps Script Web App URL
paths:
  /exec:
    get:
      operationId: getDocContent
      summary: Retrieve Google Doc content
      responses:
        '200':
          description: Successfully retrieved content
          content:
            application/json:
              schema:
                type: object
                properties:
                  content:
                    type: string
                    description: Google Doc text content
        '400':
          description: Error retrieving content
          content:
            application/json:
              schema:
                type: object
                properties:
                  error:
                    type: string
                    description: Error message
Ensure the server URL matches your Web App URL (found under Deploy > Manage Deployments in Apps Script) and that path: /exec for proper routing.
Wrapping Up
With this setup, you’ve equipped your custom GPT with real-time access to your Google Doc—allowing it to pull the latest updates at any time. This setup opens up plenty of possibilities for streamlined workflows, automated updates, and much more. Give it a shot and let us know how it works.
Frequently Asked Questions about Connecting a Google Doc to a Custom GPT
What are the two main ways to connect a Google Doc to a custom GPT?
The two options are: (1) using the pre-built assistant called Connect Shared Doc with AI, which guides you through setup, or (2) following a DIY setup using step-by-step written and video guidance.
How should I set the sharing permissions on the Google Doc?
You should set the Google Doc to “Anyone with the link” as Viewer. The guide warns: “keep confidential info out of this doc” since it’s publicly accessible with the API.
What does the Google Apps Script code need to include?
The code must include a doGet function that retrieves the text content of the Google Doc by its ID and returns it as JSON. The post provides a sample function using DocumentApp.openById() and ContentService.createTextOutput().
What deployment settings are needed for the Google Apps Script web app?
When deploying as a Web App, you must select Web app as the type and choose “Anyone” under “Who has access.” This ensures the GPT can access the document via the public URL.
How do I test the web app before connecting it to GPT?
Paste the Web App URL into a browser to confirm it returns your document’s content. You can also ask ChatGPT: “Generate a test URL to retrieve my Google Doc content using this Web App URL.”
What tool is used to generate the OpenAPI schema?
Use ActionsGPT to generate the OpenAPI schema. Prompt it with: “Create a schema for a Google Doc API with path: /exec. Here’s my Apps Script code and Web App URL:”
What path must the OpenAPI schema use for the Google Doc API?
Ensure the path is set to /exec in your OpenAPI schema. The guide advises: “If ActionsGPT outputs /, update it to /exec for proper routing.”
What final steps are needed in the GPT setup after adding the schema?
After pasting the schema in the GPT’s ‘Actions’ setup, add conversation starters, instructions, and an image. Mention in the description that the GPT can retrieve data from the connected Google Doc.
Can this setup retrieve live updates from a Google Doc?
Yes. The setup enables your custom GPT to pull real-time content from the Google Doc. “This setup opens up plenty of possibilities for streamlined workflows, automated updates, and much more.”


